Wire-Working: Simple Loop or Wrapped Loop?
How to Choose Which Wire Loop to Make For Your Jewelry Project
The most helpful jewelry wire-working technique you can know is making a loop in a piece of wire. If you can create the basic loop, you will have a place for a link or connection in your design.
A common earring, for example, consists of beads on a headpin (which is basically a wire with a flattened end). The top of the wire is turned into a loop, and then that loop connects to an earwire. Another classic use of the loop is the link. Put a bead (or beads) on a wire, make a loop on either side of the bead and you now have a link – you can connect to both sides of the beads, like a rosary. Once you are comfortable with making a loop, the possibilities and variations are endless.
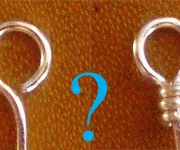
There are two types of loop that you can make: the simple loop (aka “open loop”), and the wrapped loop (aka “closed loop”). The simple loop is just that. The very end of the wire is simply turned into a circle until it meets itself again. This loop can be opened and closed, like a jump ring. The wrapped loop is similar except you start turning the wire not at the very end of the wire but deeper in. This way you have a tail of wire that can be coiled, or wrapped, under the loop. Once your wire has been coiled this lop is closed and cannot be opened.
So which loop is the best one for my project?
Whether you are making earrings, a linked bracelet, a connection for a clasp, or whatever else you’ve dreamed up, there are pros and cons for each method. As you can see, some elements of each technique can be a pro OR a con depending on what you need for your design.
The simple loop

- has fewer steps, and is therefore easier for some people (+)
- uses less wire (+)
- can be opened and closed so the component can be moved (+)
- can open up and potentially fall off (-)
- will be weak if the wire is too thin or too soft (-)
The wrapped loop

- appears a little bit more professional (+)
- is closed and won’t slip off (+)
- can utilize the coiling as part of the design (+)
- uses more wire (-)
- is more difficult for some people (-)
- is closed so the component can’t be moved (-)
Ask yourself these questions when choosing a simple loop vs. a wrapped loop.
- Do I have enough wire? For instance, if you only have a 1/4″ left on a headpin, you’ll have to go with the simple loop.
- Is my wire thick enough? If you are making a simple loop, you’ll need at least 22ga wire so the chances of it opening up are reduced.
- Is my wire stiff enough? Some craft wires are very soft and even the thicker gauges are easy to pull open. If your wire is soft, stick with a wrapped loop.
- Do I want to move this looped component around? For example, if you are making a charm bracelet or necklace and expect to move the charms around you will need to make open (simple) loops. [An alternative: used closed loops but connect with jump rings.]
- Am I connecting to something thin that can slip through an open loop? If you are making a drop that will hang from beading wire or thread, for instance, there is a very good chance that the stringing material will slip through the opening of the simple loop – even if it seems well closed.
- Is there room for me to maneuver the closed loop? If you are clustering several drops in a tight space, sometimes it is just too crowded to make a good wrapped loop. Either attach wrapped loops with jump rings, or if that’s too much hardware, go with the simple loop.
- Will either loop add to the look of the design? Sometimes, a wrapped loop looks more professional, or maybe an extra-long coiled wrap will make the piece look more unique. On the other hand, perhaps you need something simple and less noticeable.
- Do I like making one style more than the other? Sometimes that’s all it takes to make the decision!

 Pamela Klein
Leave a Reply
Want to join the discussion?Feel free to contribute!