

Nine How-To Tips for Using Paste Flux
Tips for Success with Handy Flux Paste Flux
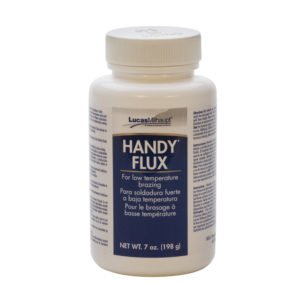
There are a lot of types of flux to use when you are soldering for jewelry. Each of them is a little bit the same and little bit different from the others. In our classes and at home, I like to use Handy Flux paste flux to prevent firescale along my seam. It’s what I used when I learned to solder and I’m familiar with it. I’ve used other types of “flow flux” over the years but always come back to Handy Flux. I guess we tend to go with what we know.
If you’re starting out with Handy Flux paste, you might find yourself frustrated with jumping solder chips, dried out flux, or ineffective protection. Here are nine tips to make it really work for you!
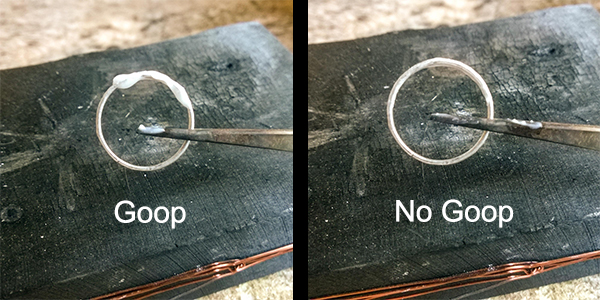
1. No goop!
Seriously. “Goop” is really the number one, most important thing that makes people get frustrated with paste flux. You only need enough flux to thoroughly coat the area you are soldering. If you have any excess paste on your piece, it will bubble and bounce as it heats up and your chip will move along with it. It will also take a long time to clear out which makes it less effective.
2. Evaporate your flux first
I just mentioned the bubbling and bouncing that happens when you have excess paste flux on your piece. This movement is caused by the water evaporating out of the flux as it heats up. The water content starts to boil as you apply your torch. If you start out with high heat, the boiling is so violent that the solder chip can literally fly off the seam, never to be found again. My advice for this is to start slow. Use a medium to low heat focused on the chips until you see your flux “go clear.” If the chip starts to move, just remove your flame a bit until it settles down, and then resume heating. Once you see the flux clear out – no liquid, no grey bubbles, no movement – increase your flame to make the solder flow.
3. Remember it has a life span
Keeping your torch on your piece too long could result in ineffective protection. That’s because flux is merely a temporary barrier to oxidization (which is what creates firescale) and after a certain amount of heating it no longer works and the firescale starts showing up. If you have a lot of “goop” or if you evaporate your flux too slowly, you might end up exhausting your flux. I believe the soldering process benefits from assertive action. I don’t mean aggressive action – we don’t want to melt our piece – but assertive. That means get in there and get it done, don’t be shy, solder with a controlled level of assertion. Clear out your flux in a timely manner to prevent exhausting its effectiveness.
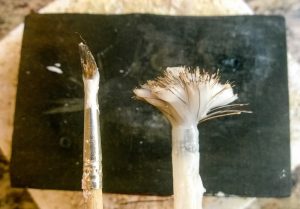
4. Smaller Brush
Needless to say, the brush that comes in the 7 oz. jar is ridiculously over-sized. Instead, use a small artist’s brush or a brush specifically designed for applying flux.
5. Cover more area for less pickle time
If you aren’t using a “barrier” flux like boric acid which reduces firescale on the entire piece, don’t hesitate to use paste flux on a larger area than just the seam. It will reduce your pickle time, protect the metal a bit, and give you a visual cue regarding temperature distribution. I never use it on the side of the piece touching the soldering pad because it gets stuck to the pad and makes a bit of a mess.
6. Use it as a temperature gauge
As mentioned above, flux provides visual cues that relate to its temperature. Most flow fluxes go clear around 1100 degrees (F). so, for example, if hard solder flows around 1450 degrees, you know that once your flux goes clear you have a 300 degree window till that flow. It also behaves in a predictable way by bubbling and changing color and appearance as it reaches that 1100 degree clear point. If the flux on one side of your seam has cleared out, but it is still bubbling on the other side of the seam, you know that you are applying your heat unevenly. You can use the visual cues from the flux to adjust your torchwork for better soldering.
7. Don’t let it get too dry
Paste flux dries up quickly and when it’s too dry it is problematic to work with. I am referring to both the flux in the jar – which seems to dry out even when the lid is closed tight – and the flux on your seam. Paste flux that is drying up in the jar is thick, goopy, chunky and wrong. But you don’t have to throw it out, either. Add some distilled water to the jar and stir it in well using a soldering pick, a chopstick, etc. Use one teaspoon at a time and creep up on your desired consistency. Try to recall what a brand new jar of Handy Flux was like and go for that level of re-hydration. You’ll know if you get to the point of re-hydrating one too many times; the flux simply won’t work and it’ll be time to get a new jar.
As for the flux drying out on your piece, it does not lose it’s effectiveness when flux sits for a long time before adding heat. But it gets chalky and flaky and increases the chance that your solder chips will move from their position. As your skills at placing chips in a timely fashion improve, this becomes less of an issue.
8. Wipe off your pick before torching
If you use a soldering pick to place your chips, you’ve probably gotten a bit of paste flux on the pick. Wipe the pick off before you start soldering, especially if the flux is visible. You may need to use your pick to make minor adjustments in the operation and excess flux will get in the way as the flux heats up and bubbles on the pick itself.
9. No goop!
OK, so this is a duplicate, I know. But truly: excessive flux (which I’m calling “goop”) leads to most of the issues that my students encounter when using paste flux. While there’s no reason to skimp on coverage, just make sure you are paying attention to how your flux is behaving under fire and be aware of how the quantity of flux affects your soldering process. As with everything soldering-related, the more you do and the more you observe, the better your outcome will be! Happy Soldering!

Im a student in Paris, Texas of the Texas Institute of Jewelry Technology. This article is great stuff! I plan to put a thin coat on pieces im joining, just as an indicator of temperature and que for placing solder. We use boric acid to coat most of the surfaces, but I think a spot on the side or top as an indicator will help.
My biggest problem is learning flame control, so I don’t melt the tiny parts.
I’m glad you found this article useful – thanks for adding to the conversation. Boric acid plus paste flux is a great combination in my opinion! As for your flame control, I’ll bet one day you’ll discover you just have it instinctively. The more you do, the more it becomes second nature. Happy Soldering!